Alexa works well for information retrieval tasks and controlling devices on your wireless home networks. We want to use the home network to track our valuables or keys. We’ll hack cheap bluetooth low energy beacons for the network range and battery longevity and build a smart application so that Alexa knows where we left the keys.
Hacking Bluetooth beacons
We’ll start by exploring what we can do with cheap bluetooth beacons.
A set of 3 beacons can be purchased for less than $15 on Amazon. These are very hackable and even iOS/Android compatible. This adafruit tutorial on reverse engineering smart lights helped us control the beacons. Start by turning on the beacon scan for the device address by running:
sudo hcitool lescan

Find & copy the address labeled with the name ‘iTag,’ then run:
sudo gatttool -I
Connect to the device interactively by running:
connect AA:BB:CC:DD:EE:FF
You should see something like this:

Running ‘char-desc’ followed by the service handle as above, we find UUIDs which we look up by referencing the gatt characteristic specifications and service specifications. For more on these services, check this out. Inspecting traffic with Wireshark, we find that 0100111000000001 triggers the alarm and guess that 0000111000000001 turns it off. Now we have the simple python function:
import pexpect
def sound_alarm(BD_ADDR):
   child = pexpect.spawn('gatttool -I')
   child.sendline('connect {}'.format(BD_ADDR))
   child.expect('Connection successful', timeout=30)
   child.sendline('char-write-cmd 0x000b 0100111000000001')
This function will make the bluetooth tag beep to aid the user in finding the valuables when they are nearby.
Making key finding smarter
With idle computers and raspberry pis spread throughout the house, we query the bluetooth beacon for the RSSI signal strength.
Taking readings from multiple machines, we use RSSI signal strength as a proxy for physical distance. We need to figure out how to use this to compute the most likely part of the house to find the beacon.

We use a simple, fast machine learning algorithm of gradient boosting machines called XGBoost. To get training data for our classifier, we run a crontab job every 2 minutes to query RSSI while we move the beacon to different parts of the house. After some time, we build a jsonl file of RSSI signal strengths from various machines for multiple rooms.
For example, put the beacon in different locations like: ‘Bedroom’, ‘Bathroom’, ‘Kitchen’, ‘Living Area’ to build up a couple dozen readings for each zone. Then we can train a classifier to predict the location based on RSSI signal strengths returned from the various computers around the house.
Loading the tuple of RSSI signal strengths into an array called train with the associated array of string location labels called label, we can train a classifier and use pickle to persist the model as below:
clf = XGBClassifier(max_depth=4, learning_rate=0.05, n_estimators=300, objective='multi:softmax', num_class=4)
clf.fit(train, label)
s = pickle.dump(clf, open('bluetooth_model.dat', 'wb'), protocol=2)
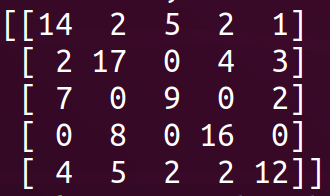
To get a sense of how well the model performs, we inspect the confusion matrix. This will help us determine if we should gather more readings or add another computer to the list. Confusion matrix indices correspond to our alphabetically sorted labels list rows correspond to actual labels with colums corresponding to predicted labels in a 20% hold out validation data set. We can iterate until we are satisfied with the results, aiming for most counts concentrated along the main diagonal of the confusion matrix.
The xgboost implementation of gradient boosting will handle the missing data which we’ll find with timed out readings. XGBoost also trains quickly, taking only seconds. We use python pickle to store the trained model. We load the pickled model into our alexa retrievr application and when we ask alexa for our keys, the most our model runs inference on the most recent RSSI readings on file.
mdl_ = pickle.load(open('bluetooth_model.dat', 'rb'))
preds = mdl_.predict(val)
Creating a Flask app and Alexa Skill
We create a skill that will be linked to a local server. Then we configure our server to take any action we’d like, in this case, provide an approximation for where the keys might be located and make the Bluetooth beacon beep.
Flask provides a simple and easy to use python library to serve an application. Using flask-ask, we can configure the server to communicate with our Alexa skill we’ll build later. Well serve the application with Ngrok, which will give us an https link we’ll need for our Alexa skill. First we built the application with the simplest functionality: to make our BLE beacon beep when triggered and predict its most likely location.
#!/usr/bin/env python
import os
import sys
import pickle
from flask import Flask
from flask_ask import Ask, statement
sys.path.append('./mdls')
from predict import loc_predict

app=Flask(__name__)
ask = Ask(app, '/')

mdl_ = pickle.load(open('bt_model.dat', 'rb'))

@ask.intent('findkeys')
def retrievr():
    os.system('sound_alarm.py &')
    speech_text = guess_locate()
    print(speech_text)
    return statement(speech_text).standard_card(title='Retrievr says...', text=speech_text)

def guess_locate():
    reply_str = loc_predict(mdl_)
    return reply_str

if __name__ == "__main__":
    app.run(host='127.0.0.1', port=5000)
Let’s break down this app for a moment. The retrievr() function is tied to the “findkeys” intent using the @ask.intent() decorator. This means that when our Alexa skill recognizes the “findkeys” intent is being triggered, it will execute whatever is in the retriver() function. This function first executes a script “sound_alarm.py” which contains the function we wrote earlier while hacking the beacons. Then it calls the function guess_locate() defined below. This function calls the loc_predict() on the model we’ve pickled earlier. It reads the most recent logs and taking the last 5 readings, returns a prediction of which room the ble is located. This text string is finally fed to the flask-ask statement() function that will make your Alexa respond with the location.
Remember, you can find all this code in our repo. Let’s build the Alexa skill to tie into this flask-ask app.
To build the Alexa skill, navigate to the Amazon developer dashboard and log in. Click on Alexa to get to the Alexa Skill kit. You should be greeted by your Alexa Developer Console.
Create a new skill by clicking the Create Skill button. You should see a screen like the one below. Name your skill and continue to the next step.
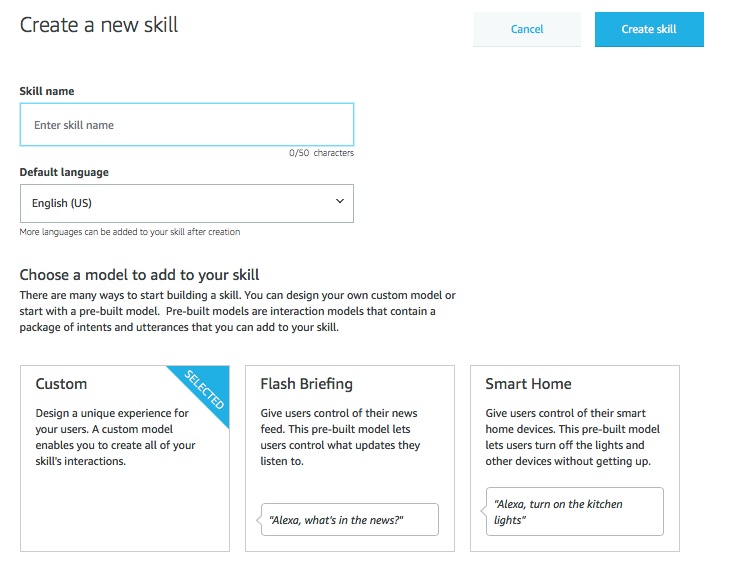
When prompted to choose a template, choose the Start from scratch option. Continue on to see this next screen:
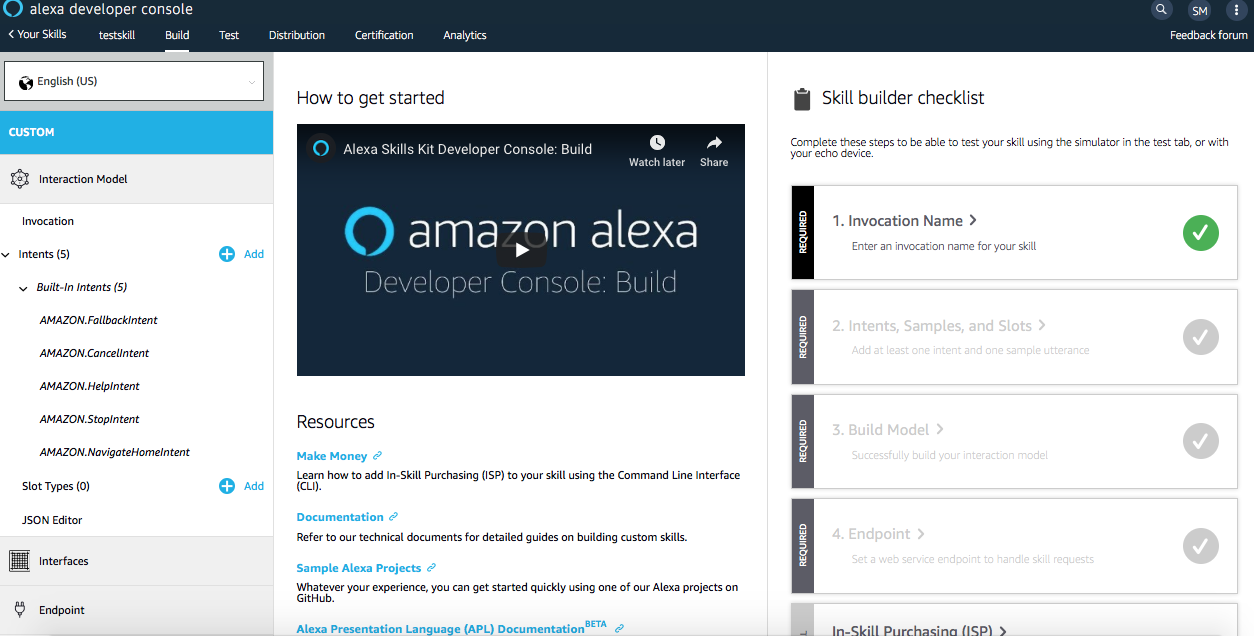
You’ll work down the skill builder checklist on the right hand side of the screen. Go to Invocation Name and choose a name to invoke your skill. Moving on to the Intents tab on the left hand side, this is where we’ll provide an intent schema to tie our flask-ask app to an Alexa skill. Make sure you’re on the JSON Editor screen of this tab. Edit the JSON file to add a “findkeys” intent.
{
    "name": "findkeys",
    "samples": ["Find my keys", "Where are my keys", "Help me find my keys", "I lost my keys"]
},
It should look something like this:

Make sure to save each step as you go! Skip over to the Endpoint tab. Select the https radio button. It’ll prompt you to provide a link to your app. Run the app.py script and in a separate terminal window, run ngrok to generate an https link:
#Go to the dir where you installed ngrok
./ngrok http 5000
Copy and paste the https link generated in each text box. For the SSL Certificate type, select the middle option that describes a wildcard certificate. Skip to Intent History, and after saving, click the Build Model button to build you skill model. This may take a few minutes, so go grab some coffee.
After saving your work, look to the top bar options:

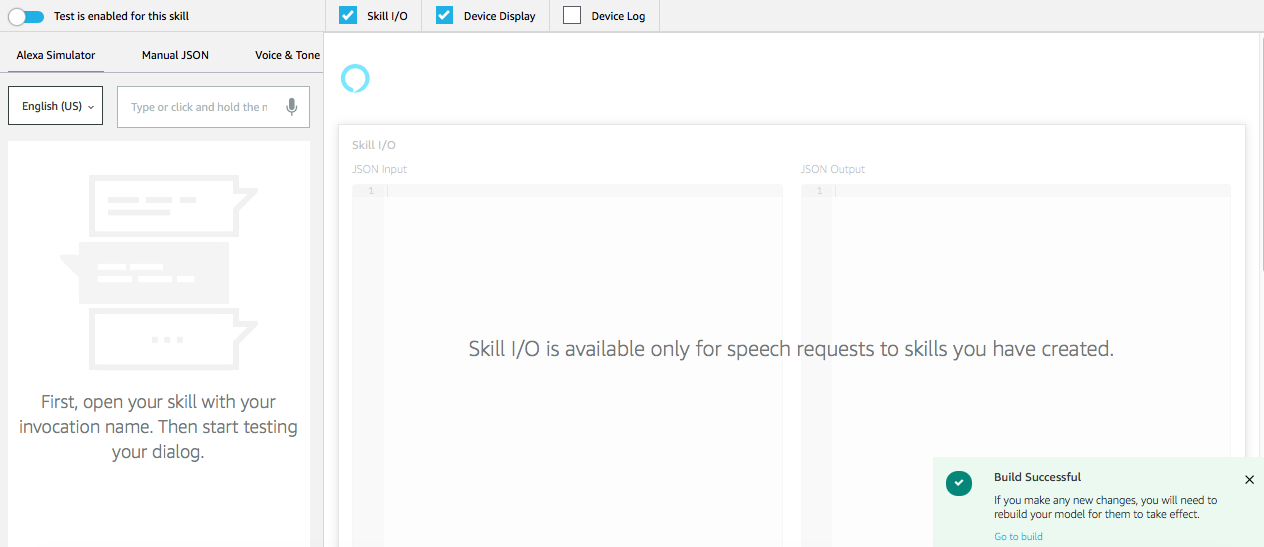
Navigate to the Test tab to test your skill in the Developer Console. On the left hand side, you’ll see a chat interface where you can ask your Alexa skill “Help me find my keys”.
If you want to test on a physical device, use these instructions.
Putting it all Together
Having a model to approximate the last location of the keys, we can add it to the application to improve the statement returned by Alexa.
We created a new function called guess_locate() which takes a file with the latest recorded rssi signal strengths. It’ll then run the samples against our pickled xgboost model and return the most likely location string. This location will be returned when Alexa is prompted. Since establishing a connection to a beacon can take a few seconds, we run a separate process calling that function in sound_alarm.py.
Wrapping all this into an Alexa skill, we can now find our keys anywhere in the house much faster.